Showing posts with label dinner. Show all posts

Wednesday, May 6, 2015

Ready In Seconds, Seriously! Homemade Mayo

I've had some people (particularly my friend John) interested in my homemade mayonnaise I've been using for our Whole30 cleanse so I made a quick video to share with you.

I follow the Everyday Maven mayo recipe because it has instructions for using an immersion blender, which gives amazing results pretty much every time.  And as you can see in the video, it's pretty much instant! 

Please forgive the shortness of the video, I recorded it with my phone and it tipped over before I was finished because of the immersion blender's vibrations on the countertop.  But as you can see, it turned to mayo in just a few seconds.  All I did to finish was to bring the immersion blender up to incorporate the oil sitting on top.  So quick! 

The most important thing to do is to use LIGHT olive oil.  Regular extra virgin olive oil is to olive-y and strong, what you need is a really light oil so it doesn't give too much flavor.   I would recommend a touch less salt, this was my first time using the Himalayan pink salt and this batch turned out a little more salty than expected.  If you're following Whole30, you should use plain mustard or mustard powder because Dijon mustard has white wine, which is not Whole30-approved. 

I've read that to make a smaller batch, you use just an egg yolk (save the white for your next omelet) and whatever amount of oil you want, like 1/4 to 1/2 cup.  But I say go for a whole 1 cup batch, this stuff is so good!  I eat it on everything these days. 

And I follow the advice that it lasts longer than one week, in my book it should last for as long as your egg.  I'm also using a farm-fresh egg that I bought at the farmers' market, really good quality. 

Wanna Chat?

I turned off the 'leave a comment' feature, so if you want to share what you're thinking about this or anything else, drop me an email at jhk1013 (at) gmail.com. It's so much more cozy than a comment, plus we can have a real conversation!

Thursday, October 16, 2014

Southwestern Quinoa and Black Bean Soup

Another requested recipe from my birthday party on Saturday was my Southwestern quinoa and  black bean soup.  I used a few online recipes as inspiration, but the final result wasn't really based on any one particular source, so this recipe is what I wrote down as my final dish in my new recipe notebook.  The notebook is a nice way to keep all of my recipes together rather than the scraps of paper in the junk drawer in our kitchen. I can't believe it took me this long to realize I should write down all of my recipes in a notebook to keep them all together. 

This soup is similar to chili, so you might want to serve it with traditional chili accompaniments like saltine crackers, cornbread, cheese, etc. 

Southwestern soup

Ingredients

  • 28 oz crushed tomatoes
  • 42 oz water or tomato juice
  • 15 oz tomato sauce
  • 14 oz petite diced tomatoes
  • 1/2 onion, diced and sauteed
  • 1/2 each red, yellow, and orange bell peppers 
  • 2 cups black beans (or a 14oz can)
  • 3 cloves garlic, minced
  • 1 Tablespoon cumin
  • 1 Tablespoon chili powder
  • 1/2 tsp oregano
  • 1 1/2 tsp salt
  •  1/2 cup quinoa

Directions

Put all of the ingredients into the slow cooker and cook on low for 8 hours.

Wanna Chat?

I turned off the 'leave a comment' feature, so if you want to share what you're thinking about this or anything else, drop me an email at jhk1013 (at) gmail.com. It's so much more cozy than a comment, plus we can have a real conversation!

Tuesday, October 14, 2014

Tae's Peas and Potatoes

At the party on Saturday, our friend Tae brought an awesome dish in the slow cooker, peas and potatoes.  She says, "It's my bastardized version of methi matar malai.  I find that it tastes better the longer it cooks, which is why the crock pot method is so nice."  It seemed like everyone at the party asked who made it and if they could have the recipe.  I also wanted to share it with everyone who reads my blog because I figure most people could stand to have more awesome and effortless slow cooker recipes. It's dairy-free, gluten-free, and vegetarian. 

From my research, the name "methi matar malai" translates to "fenugreek peas cream" and is a Punjabi north Indian recipe.  Here's Tae's recipe!

Ingredients

  • Large potatoes - 2, cut into chunks
  • Frozen Peas – 16 oz (1/2 kg)
  • Coconut milk – 1 14oz can (don’t use lite, use the full fat stuff)
  • Tomato – 1 can diced 14oz
  • Salt – to taste
  • Oil – 1 Tbsp
  • Ginger – 1 Tbsp, minced
  • Onion – 1 medium, chopped
  • Cumin powder 1 tsp
  • Turmeric Powder – 1/4 tsp
  • Coriander Powder – 1 tsp
  • Garam Masala – 1 tsp
  • Red Chili Powder – 1 tsp
  • Optional: Add fresh cilantro on top before serving
  • **Optional: add chicken

Crock Pot Method

Put the oil in the bottom of the crock pot. Add the onions, potatoes, peas, and tomatoes. Throw
in all the spices and add the coconut milk. Set on low for 8 hours. Serve over rice.

Stovetop Method

  1. Heat Oil in a medium pan on medium heat.
  2. Add onions and cook until a light golden color
  3. Add ginger and cook for 2 minutes
  4. Add all spices, potatoes, and tomatoes and cook for 2-3 minutes
  5. Add peas and coconut milk and simmer for 15-20 minutes until potatoes are cooked all the way through.
  6. Serve over rice. 
********
From my research, this dish can also have spinach in it to replace the fresh methi (fenugreek) leaves.   I would also add garlic, because I think it pretty much belongs in every savory dish.  And since I can't leave well enough alone, I would probably see if it would be good with a can of chickpeas mixed in, cauliflower florets, or maybe some cubed tofu.  I would also love to add some sliced mushrooms, but that's not going to happen with my family! 

I love Indian food and this inspires me to want to make some. Thanks for the recipe, Tae!

Wanna Chat?

I turned off the 'leave a comment' feature, so if you want to share what you're thinking about this or anything else, drop me an email at jhk1013 (at) gmail.com. It's so much more cozy than a comment, plus we can have a real conversation!

Friday, June 20, 2014

Marinated and Grilled Mushrooms

This recipe didn't come from my stash of bookmarks, it was something I looked up on the spur of the moment and I'm so glad I found it!  It was seriously so good! I made this recipe just for myself since nobody in my family eats mushrooms, but as I was eating the leftovers I offered a mushroom to Sonny D.  He didn't want one but he changed his mind once they were all gone.  Too bad, buddy, should have moved quicker. 

The big tip for this recipe is starting the skewers to soak ahead of time if you've got bamboo ones.  I put mine in a 2-quart pitcher of water and put the lid on to keep them submerged.  And luckily mushrooms don't need a ton of cooking so if you don't get a super long soak they should still be fine since they won't be on the grill long enough to get super charred. 
 

Inspiration 

Natasha's Kitchen grilled mushrooms on skewers

I skipped the parsley and the instructions to whiz it up.  And I substituted Korean red pepper flakes (gochujaru) for the cayenne pepper. 

Ingredients

  • 1/4 cup olive oil
  • 1/4 cup lemon juice
  • small handful of parsley (I skipped this)
  • 1 tsp sugar
  • 1 tsp salt
  • 1/4 tsp pepper
  • 1/4 tsp cayenne pepper  (I replaced this with a sprinkle of gochujaru)
  • 1-2 garlic cloves (mine was minced from a jar)
  • 1 Tbsp balsamic vinegar
  • 16 oz button or baby bella mushrooms

Directions 

Put together all of the marinade ingredients and the mushrooms in a bowl or zippered bag and marinate for at least 30 minutes.  I put my mushrooms in the marinade over lunch and grilled them up for dinner, so mine marinated for several hours.

Soak your skewers now too if you've got bamboo ones. 
Mushrooms marinating
Preheat your grill to medium-low heat, about 300 degrees.  Thread the mushrooms onto the skewers and grill for about 3 minutes per side. 
After grilling.  Not attractive, but sooo tasty!

Verdict

So incredibly good!  I had to exercise my amazing willpower to not eat the whole pound at once and save half for the next day.  I love how simple the marinade is, it's things you

I ran out of lemon juice making this recipe so I couldn't make this same marinade, so a few days later I made an Asian marinade for another batch of mushrooms.  While the second one was quite good, it wasn't as amazing as this one.  We bought another bottle of lemon juice, but now I'm running low on balsamic vinegar.  I definitely need to make sure I'm well stocks on all the ingredients because I'm pretty sure I'm going to make this recipe all summer!

Wanna Chat?

I turned off the 'leave a comment' feature, so if you want to share what you're thinking about this or anything else, drop me an email at jhk1013 (at) gmail.com. It's so much more cozy than a comment, plus we can have a real conversation!

Wednesday, June 11, 2014

Sweet And Spicy: Baked Coconut Shrimp With Marmalade Dipping Sauce

I use the Google Bookmarks website for all of my online bookmarks, I don't depend on the browser itself to store my bookmarks because I use so many different devices (work computer, home computer, iPhone, iPad) that I wouldn't be able to transfer them or keep them up to date.  So I use the online service and it's great.  One great feature is that instead of filing a bookmark in a single folder, you can give each one multiple tags.  My general tagging concept for recipes is the protein (beef, chicken, shrimp, vegetarian, etc.), type of dish (main dish, appetizer/snack, dessert, breakfast, etc.), and then an extra tag if it's a light/healthy/low-calorie recipe.  For my weekly meal planning, I check the freezer inventory for the available proteins and then browse my recipes for that protein.  So a few weeks ago I looked through my shrimp recipes and found this recipe for baked coconut shrimp.  Once I rediscovered it, I decided I had to use up the partial bag of shrimp (half a pound) for this and I wouldn't be swayed.  I have liked coconut shrimp in the past, but haven't had it in a long time, so I really wanted to try it. 

Inspiration


You could easily make this gluten-free by using a gluten-free flour for your first breading station.  

Even though I was making only half a batch, I made the full amount of the breading ingredients because I hate running out in the middle of breading and needing to make more while you've got goopy hands.  The only thing I didn't use the full amount on was the coconut because I only had a little bit in the freezer.

Ingredients

serves 2
  • 1/2 pound large shrimp (I buy the Target Market Pantry 41/50 count per pound tail-off, peeled, and deveined)
  • 1/3 cup all-purpose flour
  • 1 1/2 teaspoons paprika
  • 1/2 teaspoon garlic powder
  • 2 large eggs
  • 1/2 cup unsweetened shredded coconut
  • 3/4 teaspoon kosher salt

I only had about half a cup of shredded coconut, but I thought it was fine for the half batch and I even had a tiny bit leftover at the end (which promptly went in the trash!). 

Directions

I started by brining my defrosted shrimp to marinade them.  Mix together 1 tablespoon of salt with 1/2 pound of shrimp and cover with water (double the amount of salt for a full pound of shrimp).  Let sit for 30 minutes.  Drain and rinse and dry them off a bit by scooping them out onto a couple sheets of paper towel.  

Preheat your oven to 450 degrees. Line a baking sheet with parchment paper (not sure it's necessary but it certainly couldn't hurt.)

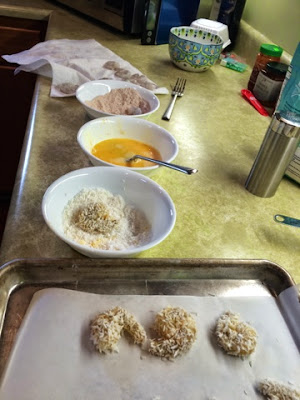
The breading process.
Meanwhile, mix together the flour, paprika, and garlic powder in one bowl. 

Crack the eggs and put them in another bowl.  Beat with a fork until yellow.

Mix the coconut and salt together in yet another bowl. 

Breading
Individually dip each shrimp in the flour mixture, then the beaten eggs, and then dip in the coconut.  Place on the prepared baking sheet.  Bake for 10-12 minutes.  Serve with the dipping sauce. 
Baked coconut shrimp.


Spicy-Sweet Dipping Sauce

For the sauce I looked at a variety of different recipes but I either didn't have all the ingredients or didn't think it was what we were looking for, so I made up my own sauce based on some ideas I saw.  I started by grabbing the new jar of marmalade from the pantry and pulling out all of our spicy condiments from the fridge.  I immediately nixed the Mexican hot sauces, they had too much vinegar. I settled on chili garlic sauce. 
sauce ingredients - chili garlic sauce and orange marmalade. 
other contenders in the background.
I mixed together 2 Tablespoons orange marmalade with 1 Tablespoon chili garlic sauce.  This was the perfect amount for our half pound of shrimp, but if you were making a full batch, I would double the sauce. 
spicy-sweet dipping sauce.

Milder Version
It was pretty spicy, so if you want a milder sauce, go with 3 Tablespoons marmalade and 1/2 tablespoon chili garlic sauce. Or if you're really wussy, try 3 Tablespoons marmalade with 1 teaspoon chili garlic sauce. 


Verdict

This dish was a little sweeter than I'm used to, but that was because of the dipping sauce.  It was quite good though!  Maybe next time I would add some Dijon mustard to the sauce and reduce the amount of marmalade to get a less-sweet sauce. 

The recipe wasn't too fussy, so you could make this dish as an appetizer for a small dinner party. 

The shrimp weren't exactly crunchy by the end of dinner, so next time I would use half coconut flakes and half panko breadcrumbs for the final breading to ensure it was extra crunchy.  Also the coconut could have been more toasted but I didn't want to bake the shrimp any longer or they might get overcooked.  So I would toast the coconut a tiny bit first, maybe for 3-4 minutes in the oven or until it's barely light golden colored before mixing it in the breading bowl.   

I also felt like there could have been more spice on the shrimp themselves but I'm not sure what, maybe some Old Bay seasoning in the flour mixture?  I don't have any of that but I've been looking to get some.  I actually have no idea what it even tastes like. 

Husband Jeff wasn't really into the whole coconut shrimp idea, but said I could make it anyway.  I'm glad he indulges my cooking plans. He loved the sauce a lot.  It would probably be really good as a spicy-sweet glaze for grilled chicken legs. 

Sonny D had fish sticks for dinner because he hasn't been interested in shrimp in the past.  He wouldn't even try the shrimp. He would have probably enjoyed the sweet sauce but it would have definitely been too hot for him.

Wanna Chat?

I turned off the 'leave a comment' feature, so if you want to share what you're thinking about this or anything else, drop me an email at jhk1013 (at) gmail.com. It's so much more cozy than a comment, plus we can have a real conversation!

Thursday, June 5, 2014

Grilled Homemade Pizza

This was some heavy-duty pizza making but I had fun rising to the challenge.  Over lunch I made my own pizza dough using part of my sourdough starter.  I enjoyed kneading the dough while I watched a TV show on my iPad.  Then after work I mixed up my own pizza sauce, not because I'm aiming for a "super cook of the year" award, but out of necessity since we didn't have any canned pizza sauce in the pantry and Husband Jeff declares there's a huge difference between spaghetti/marinara/pasta sauce and pizza sauce.  But the sauce was really easy, it's pretty much just tomato paste and spices.

Once all of the toppings were ready, we preliminarily grilled the crust, topped it, and then put it back on to finish cooking and heat up the toppings. I'm glad I didn't make the sausage or the cheese, but rest assured, I do have two mozzarella cheese making kits, so it's possible! 
Messy homemade pizza sauce. Should have used a bigger bowl.
Of course you don't have to make your own crust, you could use one of those pre-cooked Boboli crusts (use medium heat since you're just warming it) or buy some Trader Joe's premade refrigerated dough.  But if you want pizza tonight and don't want to go to the store, here's a quick 10-minute, four ingredient pizza dough recipe. It doesn't require a lot of kneading and uses a bottle of beer instead of yeast.  I've made it before and it's quite good.

I'm going to cover the general grilling part of the pizza so you understand the concept, but also included the recipes for the pizza crust and the sauce in case you want to try those as well.  

Inspiration

I put only half of the pizza sauce on the pizza since the grilling instructions said not to load it up with sauce or it would get soggy.  I heated up some of the remaining sauce for Husband Jeff so he could dip his pizza since he likes a lot of sauce.

You can make this vegetarian by using your favorite vegetarian pizza toppings.  It can also be dairy-free if you leave off the cheese.  Once upon a time I had an awesome tuna and artichoke pizza that didn't have cheese or red sauce.  So incredibly good.  Maybe a hummus sauce and topped with tuna and artichoke hearts?   Or cheese-free pesto with chicken and tomato slices?

Directions

Set up your grill for medium-high heat. 

Pat/stretch the dough until you get the thickness you want.  For grilling I recommend a thinner crust to ensure it gets fully cooked in the middle.  This is not the time for a thick pizza. We have a wide gas grill, not a round kettle charcoal grill, so a long pizza worked out fine.  If you have a round grill, aim for a rounder crust. I'm terrible at rolling out baked goods in a desired shape, I just aim to get it the right thickness.

My dough wasn't sticky, so I was able to roll it out with my rolling pin on my big baking sheet.  I sprinkled the baking sheet with a bit of flour to ensure we could slide it off when the time was right. 
Rolling out the dough.

While the grill was getting up to temperature and Husband Jeff cleaned it off and oiled the grate, I cut two Trader Joe's sweet Italian sausages into rounds.  The sausages are already cooked, but I heated them them in a pan to ensure they got a little brown.   I also chopped up some green olives and pulled out the frozen shredded cheese to let it defrost a bit. 
cooked up the pre-cooked sausage
When the grill is ready, transfer the crust to the grill and cook for about 2 minutes. Thee crust stuck to the baking sheet a tiny bit on one side, but we were able to get it on the grill without any real issues.  After the two minutes, use a pair of tongs to turn the crust 90 degrees and cook it for another minute to get pretty cross-hatch grill marks. Our grill was quite hot and we had to pull it off before the time was up to ensure it didn't burn. 
First grilling of the crust.  A tiny bit darker than I like.
The instructions said to spread the browned side of the crust with olive oil, but I don't know what good that did.  I followed it anyway.  Butter would be good too.
Husband Jeff enjoying wine on the deck while the grill heats up.
After a slathering of olive oil on the grilled side of the crust, add the sauce and toppings on the grilled side as well.  The ungrilled side will go down on the grill so it gets some color (ours got a lot, almost burned that side too!) and close the lid to ensure the toppings get warmed up and the cheese melts.
Finished pizza.  No green olives on Sonny D's side.

Verdict 

Next time we'll turn the grill down, it was really hot.  I would also like to season the crust more, maybe with some herbs and spices but possibly also more salt.  I wish we had a charcoal grill to add that awesome charcoal flavor, but I do like the quickness and ease of lighting up a gas grill.

The instructions I followed for grilling the pizza were kind of confusing and I had to check them several times to make sure I understood what was going on.  It's actually really simple:
  1. Put the raw crust on the grill, cook for about 2 minutes.
  2. Take crust off the grill, flip it so the grilled side is up and cover with sauce and toppings. 
  3. Put the pizza back on the grill and cook for 2-3 more minutes. Slice and enjoy.
I thought the pizza was fine, but I'm not a huge pizza fan.  Husband Jeff loved it and said it was almost as good as his favorite frozen pizza, Jack's rising crust. Sonny D ate several slices, so I think it was a hit with him too. Since I'm the cook, I used my choice of Trader Joe's sweet Italian sausage (love it!) rather than our usual pepperoni topping, but I would have also loved a bunch of mushrooms on it.  My guys are against mushrooms, so I chose to skip them for family harmony. 

Next time I would also look up how to make a chewy Neapolitan pizza crust.  I think that is allowed to rise and rest for at least two days, which I would hope would make it chewier. And probably adding some bread flour rather than all-purpose. 

Maybe next time I would go with smaller rounds of dough so we could each have our own pizza and it would be easier to manage on the grill.  The guys are pretty traditional with their toppings and I want different things, like maybe an Indian pizza with palak paneer, or eggplant and zucchini with mushrooms.  Or a Mexican pizza with enchilada sauce, beans, cheese, tomato, taco meat, and sauteed spinach. 

Wanna Chat?

I turned off the 'leave a comment' feature, so if you want to share what you're thinking about this or anything else, drop me an email at jhk1013 (at) gmail.com. It's so much more cozy than a comment, plus we can have a real conversation!

Wednesday, May 14, 2014

Condensed Soup Challenge: Transformed Into Alfredo Veggie Lasagna

This recipe was inspired by the lone can of Campbell's condensed cream of broccoli soup I had sitting in the pantry.  I had no idea why I bought it, it must have been for a recipe I was interested in a long time ago since I couldn't even recall buying it in the first place.  I figured I should probably use it up, which is usually a great way to provoke some creativity in the kitchen.  I started with my classic approach, search on the internet, this time looking for recipes using "cream of" soup. I found the shortcut alfredo lasagna recipe linked below, but decided it was healthier to make a version with a lot more veggies, regular noodles, and a lot less cheese.  Hopefully you find it motivating enough to make your own version!
 

Inspiration


Making The Dish

Our kitchen was chaos while I was preparing this recipe when I was home from work over lunchtime. I had three burners going at one time, was putting together two versions of the dish (one with mushrooms for me), and chopping up loads of veggies. I used an 8x8 baking dish and I think something like a 9x7. 
Sideways shot of my kitchen counter while working on this dish.
I made the alfredo sauce, but used only half the amount of milk and added the can of Campbell's condensed cream of broccoli soup. It was the perfect texture and I didn't need to change anything. 
Creamy layers.

I layered my new creation of broccoli alfredo sauce with lasagna noodles, bell pepper (cut paper-thin on my mandolin slicer), zucchini (cut thin as well), a bit of torn spinach, sauteed shredded carrot, sauteed sliced mushrooms, and shredded mozzarella.  I pre-cooked the carrot because otherwise it might not have been enough time in the oven to soften it properly.  I pre-cooked the mushrooms so they didn't release all their liquid and make my pan too wet.

I hadn't planned too well when figuring out how many noodles I needed.  I laid the dry noodles out in several various baking dishes to see what configuration would fit best in the right size baking dishes.  I worked it out that there would be two layers in each dish (that's all the noodles I had in the house, seemed perfect), but forgot that when you make lasagna you need to end with a layer of noodles on top to keep everything from drying out.  Luckily I had to trim the noodles to fit into my two baking dishes and ended up with enough scraps to make top layers for both dishes. 

Deliciousness inside
I put them together over lunch and then packaged them up and put them in the refrigerator so I could bake them when I got home.  It took about 50 minutes to bake at the ubiquitous 350 degrees, half of the time covered with foil and the second half uncovered.  

Verdict

This dish turned out great.  It was even better once we added a sprinkle of salt to the servings on our plates.  I'm still not very good at properly seasoning my dishes.  I'm always afraid I'm going to over-salt it since I like my food a little saltier, so it ends up that I under-salt it since I'm so paranoid about it.  If I had properly seasoned it from the start, it probably would have taken less salt overall.  I was afraid that the canned soup was going to be more than enough salt. 

It ended up that Sonny D never even tried this dish.  I'm still not sure if he would have liked it or not.  The veggies might have turned him off, but the creamy cheese sauce might have been appealing.  That kid is such an enigma.

I love making dishes that leave you with leftovers so you can have them for lunch later in the week.  This made several servings, probably about 6-8 depending on how hungry you are.     

My version was vegetarian, but it would be great with some cooked chicken.  And of course bacon would be welcome.  For veggies you could also add cherry tomatoes, roasted red pepper, broccoli, peas, artichoke hearts, asparagus, etc.

Wanna Chat?

I turned off the 'leave a comment' feature, so if you want to share what you're thinking about this or anything else, drop me an email at jhk1013 (at) gmail.com. It's so much more cozy than a comment, plus we can have a real conversation!

Wednesday, April 23, 2014

Savory Flavor Enhancer: Miso Butter

I've read about miso butter a few times and originally thought it was some sort of special sauce, but I got really curious so I researched it and found it's literally just miso and butter mixed together.  Miso is salty fermented soybean paste, it's usually made into miso soup that you might have at a sushi restaurant or it's mixed into Asian dishes.  I finally decided to try it by having toast with butter and smear of miso paste. 

When I went to get my miso it was all dried out after sitting in the fridge with the lid off.  Oops.  Totally not my fault, the lid was really flimsy and I thought it was covered.  I still scraped some out of the least dried-up area and tried it.  Wow!  It's an amazing savory taste that I found myself really enjoying.  Actually, a few days later my mouth was watering over the idea of more miso butter on a crumpet for lunch.  So good!

Last week Sonny D and I went grocery shopping and I decided to buy a new container of miso.  I picked up a 13-ounce tub of Westbrae Natural unpasteurized white miso.
The tub of miso I bought.

Then I figured I should probably look up a more official recipe than just "a bit of miso with some butter".  I found a recipe that gave a ratio of 2 parts butter to 1 part miso, so I grabbed a small Tupperware container and combined 2 tablespoons butter with 1 tablespoon miso since I figured that amount would probably last me quite a while but wouldn't stick around so long it would go bad.  The only thing is that I keep it in the refrigerator, which means the butter is pretty much unspreadable.  I need to remember to pull it out of the fridge a little early to give it time to soften.
Easy recipe.  Miso + butter = miso butter.

Verdict 

I love this and it's nice to have a pre-made batch so I can quickly spread it on my morning toast or throw some on veggies.  But this probably isn't for everyone since miso is salty with  'umami' (savory) flavor.  It kind of reminds me of fish without being fishy; that's probably the fermentation.  If you're interested in trying a new neat flavor, I recommend giving it a shot.  I want to try it on corn, seems like it would be a great combo.  Can't wait to see what else I can add it to.

The neat thing is that since my miso is unpasteurized, I'm also getting the benefits of probiotics.   Yay, happy digestion!

Wanna Chat?

I turned off the 'leave a comment' feature, so if you want to share what you're thinking about this or anything else, drop me an email at jhk1013 (at) gmail.com. It's so much more cozy than a comment, plus we can have a real conversation!

Friday, April 18, 2014

Superstar Pepperoni Pizza Skillet

Here's a quick recipe write-up of the pepperoni pizza skillet I made last week. This is mainly a concept so you can customize it with your favorite pizza toppings.  The only measurements are the 8 ounce can of pizza sauce and the amount of rice (approximately 1.5 cups cooked). 

Inspiration

Green Lite Bites pepperoni pizza rice

As written the recipe isn't dairy free or vegetarian, but you could easily skip the cheese or use a non-dairy version.  And of course for a vegetarian version use whatever your favorite pizza toppings are - faux sausage crumbles, artichoke hearts, black olives, jalapenos, etc.  And it's easy to add extra toppings to your own serving if your family doesn't agree on the ideal pizza. 

Directions

Cook 1 cup brown rice or you can do like I did and mix half brown rice and half quinoa.  I did this in my rice cooker and I added a packet of onion soup mix to the water to give it flavor.  I also started the rice cooker in the morning and let it sit on the 'keep warm' setting until it was time to cook dinner so we didn't have to wait for the rice to cook since brown rice can take close to an hour.

When you're ready to cook dinner, over medium-high heat saute some chopped peppers and onions.  Mine come frozen in a bag, it's called "pepper stir fry mix", totally love it.
A little extra chopping of the peppers and onions.

Add some chopped spinach and minced garlic (from a jar) and cook a couple minutes until the spinach is wilted.

Then add some diced tomatoes, a pinch of oregano, and chopped pepperoni.  Add an 8 oz can of pizza sauce.   The add some of the rice, only as much as you think looks right.  I used about half of the rice-quinoa mix and saved the rest for fish dinner a couple nights later.  I added shredded mozzarella cheese on top and covered to let it melt over low heat, but if you want more cheese, stir some in and add more on top. 
Not beautiful, but tasty. 
After this photo I added shredded cheese and covered to melt it.

Verdict 

Like most skillet/casserole dishes this wasn't good looking but it sure was delicious.  I completely loved it and wanted to eat more, but I had cardio dance fitness class after dinner and with all the bouncing and jumping I was afraid if I ate more than I would be sick on the floor.  I sauteed a bunch of mushrooms and added that to my bowl since I'm the only one in the family that likes mushrooms. And I chopped up green olives for Husband Jeff and I to add to ours. 

It was good as leftovers too.  I will definitely make this again.  I'd like to figure out how to include more veggies though. Maybe I'll substitute part of the rice mixture with cauliflower "rice" (granules of cauliflower that mimic rice). 

Sonny D likes pizza well enough, but he doesn't LOVE it.  He ate a little bit of this, but wanted just the plain rice-quinoa with soy sauce. 

Wanna Chat?

I turned off the 'leave a comment' feature, so if you want to share what you're thinking about this or anything else, drop me an email at jhk1013 (at) gmail.com. It's so much more cozy than a comment, plus we can have a real conversation!

Wednesday, April 16, 2014

Better the Second Day: Roasted Broccoli

This is a recipe that I made for dinner in February but am now just getting around to posting.  Broccoli is Husband Jeff's favorite veggie and I think it's ok but I don't want it all the time.  It's always fun to see how I can change it up to be even better.

Even if you really don't like fish I think you should try this recipe.  But if you're allergic, of course skip it!  You could probably substitute a bit of miso for the anchovy though, maybe a teaspoon or two.   And I don't remember it being spicy, so I probably either substituted Korean pepper flakes (gochujaru) which is not spicy at all, or I skipped the red pepper all together.

This roasting method is one I use often, you start with a foil-covered dish/container/baking sheet to let the veggies steam themselves at a high heat and then remove the foil for the rest of the roasting so the moisture evaporates and get the veggies browned a bit. 

Inspiration 

Cooking Light roasted broccoli with garlic and anchovy

You could easily make this dairy-free by switching out the butter with coconut oil or olive oil. I don't recommend skipping the anchovies though, they're going to add a savory saltiness. 

Ingredients

  • 6 cups broccoli florets
  • 1 Tablespoon extra-virgin olive oil
  • 3 cloves garlic, minced
  • 1 1/2 Tablespoons butter, melted
  • 1/2 teaspoon dry thyme (it called for 2 tsp fresh thyme, but who has that?)
  • 2 tsp lemon peel (I used dried from Penzey's)
  • 3/4 tsp crushed red pepper
  • 2 anchovy filets (I used a couple squirts of anchovy paste in a tube)
  • 1/4 tsp kosher salt

Directions

Preheat your oven to 450 degrees.  

Toss the broccoli florets with the tablespoon of olive oil and pour out onto a sheet pan and cover tightly with foil.  Bake for 6 minutes.

Meanwhile, mix together the rest of the ingredients for the sauce except the garlic.
Anchovy sauce.
Remove the foil, add the garlic to the broccoli and cook uncovered for an additional 6 minutes.
Broccoli and garlic

When the broccoli is tender, remove from the oven and toss with the anchovy sauce. Serve.
All tossed together.

Verdict

Roasting your veggies is pretty much always the way to go, it might take a little longer than steaming or the microwave, but it produces much better flavors.  This was pretty good at dinner the first night, but totally amazing the next day after it soaked up the sauce.  The flavor was a lot more buttery and rich tasting as leftovers. And if I remember right, I chowed all of the leftovers by myself since I come home for lunch pretty much every day. 

Wanna Chat?

I turned off the 'leave a comment' feature, so if you want to share what you're thinking about this or anything else, drop me an email at jhk1013 (at) gmail.com. It's so much more cozy than a comment, plus we can have a real conversation!

Wednesday, April 9, 2014

Ten-Minute Enchilada Sauce for Chicken Enchiladas

Are you:
  • out of enchilada sauce but want to make enchiladas?  
  • too lazy to go to the store?  
  • an overachiever who is trying prove that you're a bad-ass kitchen ninja by making your own enchilada sauce? (I think this is the one most applicable to me, but also #2.)

Well, if any of those things above applies to you, here's the enchilada sauce I made from scratch on Sunday.  I wish I had a nicer chili powder for a deeper flavor, but I used regular McCormick chili powder that we use for chili.  Our grocery store didn't seem to have anything fancier and I couldn't use anything spicy for fear of Sonny D not eating it.  

Sonny D was my helper for this recipe, he did a great job being careful when stirring and didn't have any mistakes or injuries.  He also reminded me to "be careful!" when shredding the hot chicken, chopping the spinach, etc.

My enchilada filling was two chicken breasts grilled on the George Foreman grill and then shredded with two forks, a can of chopped green chiles, most of a can of petite diced tomatoes, some chopped spinach, a splash of enchilada sauce to keep it moist, and some shredded sharp cheddar cheese.  I like using strong-tasting sharp cheddar for cooking because it has more flavor than a milder cheese so I can use less of it.  You could fill your enchiladas with seasoned ground meat or roasted veggies.  Oh, I also like roasted veggies with scrambled eggs in enchiladas, an excellent breakfast dish.

Oh, and we prefer corn tortillas for enchiladas, not flour.

This sauce recipe made enough for 13 enchiladas, which filled an 8x8 and 9x13 pan.

Inspiration

All Recipes ten minute enchilada sauce

My Modifications

I used half as much oil because I didn't see a reason to use that much and you could probably make it without any oil at all.  And instead of self-rising flour I used white whole-wheat flour because that's what I had and I didn't think it needed the extra salt and baking powder in self-rising (pretty sure we're just looking for the thickening power of flour).  And when I looked in the pantry I realized I didn't have tomato sauce, so instead I used a 6 oz can of tomato paste and added more water until it looked right.  I added 1/4 tsp of salt to start, but added more later after tasting. 

Ingredients

  • 2 Tablespoons vegetable oil
  • 2 Tablespoons flour
  • 1/4 cup New Mexico or California chili powder
  • 1 (8 ounce) can tomato sauce (or 6 oz can tomato paste with at least 1 additional cup of water)
  • 1 1/2 cups water
  • 1/4 teaspoon ground cumin
  • 1/4 teaspoon garlic powder
  • 1/4 teaspoon onion salt
  • salt to taste (at least 1/4 teaspoon)

Directions

Heat the oil in a medium-large skillet on medium heat and add the flour and chili powder and stir it with a whisk. 

Pulling out our ingredients.
The flavor is even better if you use Sonny D's favorite egg-shaped whisk. 
Whisking the flour and chili powder.
Add in the rest of the ingredients and cook over medium heat for 10 minutes.  Taste and probably add more salt. 
Whisking up the sauce.
Sonny D carefully stirred.  I'm actually in too much of a hurry when I'm cooking so I tend to make a mess when I stir, so I would say he actually did a better job than me. 
 He's wearing a carpenter's apron around
his little waist and I was wearing my cooking apron.
Use a little sauce in your enchilada filling.  
One 8x8 pan of four enchiladas. 
Later I added shredded cheese and put it in the freezer to save for another day.
Fill and roll your enchiladas and place them seam side down.  Pour the rest of the sauce over your filled enchiladas. 
And one 9x13 pan of nine enchiladas. 

The baked enchiladas after we've ravaged them. I purposely left my burned oven mitt in the picture. 

Verdict 

It wasn't much work to make it since it was generally hands-off (aside from Sonny D's love of whisking) but I wouldn't say that it's better than canned.  I bet it's a lot better if you use a good chili powder though. Even if it didn't rock our socks off, it's nice to know you can make red enchilada sauce without going to the store.

I wish I had added even more salt, to me it seemed a little bland.   I have this problem about not adding enough salt, I'm afraid to add too much since I like saltier foods than my family.  Plus it might seem fine when you taste it plain since it's the only flavor in your mouth, but later I find that a little more salt when cooking would have added so much more.  I'm still trying to figure out the right amount. 

After all of this though, I have to say I actually prefer green enchilada sauce instead, so I'm off to bookmark some green enchilada sauce recipes. 

Wanna Chat?

I turned off the 'leave a comment' feature, so if you want to share what you're thinking about this or anything else, drop me an email at jhk1013 (at) gmail.com. It's so much more cozy than a comment, plus we can have a real conversation!

Thursday, April 3, 2014

Tempeh Nuggets: They Happen to Be Vegan

Sonny D and I made breaded tempeh sticks on Monday.  They're supposed to be served with buffalo wing sauce to be like buffalo wings, but wouldn't ya know it, we had only a tiny bit of Frank's buffalo wing sauce in the fridge and no extra bottles in the pantry.  Ugg.  I like to think of myself as a super-prepared gal, so it's amazing that I don't have 3 extra bottles on hand. No worries though, we've got a ton of condiments in our fridge so we made it work.

Let's start with tempeh.  Tempeh is fermented soybeans pressed together.   Tempeh looks like little blobs of tan cottage cheese pressed together, like a pale veggie burger, and has a nutty, earthy flavor.   It's a lot less processed than tofu, that's why I use it sometimes. Plus Trader Joe sells organic 3-grain tempeh and I've totally been brainwashed to think that pretty much anything Trader Joe's sells is amazing.  

You can use this recipe to bread pretty much anything, I'm thinking I might use it on shrimp next.  

Inspiration

Tastebook buffalo tempeh "wings" (made without modifications!)

Ingredients

  • 8 oz package of tempeh (the Trader Joe's tempeh is 8oz)
  • 1/3 c milk (I used unsweetened almond milk)
  • 1/3 c flour
  • 1/2 tsp salt
  • 1 tsp thyme
  • 1 tsp paprika
  • 1/2 tsp garlic powder
  • Freshly ground pepper to taste
  • 1 cup Italian seasoned panko crumbs (I used whole wheat unseasoned)

Directions

I've heard steaming tempeh makes it less bitter, so at lunch time I sliced it into 12 pieces and steamed it for 20 minutes in the electric steamer.   Then I sprinkled it with some Bragg's liquid aminos (tastes like soy sauce) and rice vinegar to sit in the fridge for the afternoon.  Last time I thought it was my imagination, but now I'm quite sure tempeh plumps when you steam it.

When you're ready to cook, preheat your oven to 400 degrees. 

This recipe follows the standard 3-bowl breading method -- the first bowl is flour, the second is either milk or egg, and the third is the breadcrumbs.

Sonny D dipped each piece of tempeh in the flour and knocked off any extra.  He was seriously really good at it.
Sonny D doing an awesome job of
coating the tempeh slices with flour.
Then you dip each piece in the milk and then into the breadcrumbs.  Put the breaded pieces on a rack in a sheet pan.
Coated tempeh waiting to go in the oven.
I love my baking rack setup you can see here, it's the Cook's Illustrated/America's Test Kitchen recommended products of the Wear-Ever half sheet pan  and CIA chrome cooling rack.  I don't think they were designed to go together, but the rack fits perfectly in the pan.  It's great for baking breaded items so the air can circulate and ensure it stays crispy.  It's also awesome for French fries, they don't end up soggy. When I used to bake French fries on a flat cookie sheet I always ended up baking them for twice as long to ensure they got crispy.  Took forever!  And the sheet pan is big, I use it to roast veggies.


I sprayed the breaded tempeh with Trader Joe's olive oil spray to promote browning. Yep, more Trader Joe's products, I think I need to profile of my favorite TJ items.  Love that place!
Closeup of browned tempeh sticks.  Look at the one in the back where the focus is.
Bake for 10 minutes and then flip and bake for another 10 minutes. 
Another shot of tempeh sticks.
I served them with the last bit of buffalo wing sauce, hot sauce, ketchup, and Dijonnaise (Dijon mustard-mayo blend).
Interior shot, looks like a fish stick. 

Verdict 

Husband Jeff and I liked them well enough, he actually commented that he liked them a lot, which is good since he didn't really care for tempeh the first couple of times.  They were pretty good with  buffalo wing sauce, but I liked them best with creamy Dijonnaise.  Husband Jeff had his with Valentina hot sauce.

I was disappointed that Sonny D barely tried his.  I was hoping I could send the leftovers to school with him for lunch.  He ate one with ketchup, but not any others.   I ended up heating up the leftovers at work in the microwave the next day, not too bad.

They were pretty plain and I wish I had seasoned the flour a bit more and the breadcrumbs as well.  More marinade seasoning would have been good too.  And I think I would have preferred cutting each slice in half the long way because tempeh is pretty dense.  But I don't know if I'll be making this again, it's just not really my thing. 

Wanna Chat?

I turned off the 'leave a comment' feature, so if you want to share what you're thinking about this or anything else, drop me an email at jhk1013 (at) gmail.com. It's so much more cozy than a comment, plus we can have a real conversation!

Thursday, March 20, 2014

Another Edition of "Put It In the Waffle Maker": Waffle Omelets

This recipe for waffle iron omelets has been on my radar for a while.  I loved how it turned out making French toast in the waffle iron and thought this might be good as well.  I've put it on several of our weekly menus but have skipped over it for various reasons.  Last night I made pancakes (blueberry and plain) while the guys made the waffle iron omelets. It turned out so awesome that I had to make sure to tell you guys about it immediately. 

Inspiration

The Gracious Pantry Clean Eating Mexican-Style Waffle Omelets

We didn't have the olives called for in the recipe and I don't like corn in dishes, so this was just eggs and seasoning, but you could add anything that is small pieces, such as sauteed diced veggies, ground meat or meatless crumbles, etc. 

Ingredients

Makes 4 omelets in our waffle iron
  • 6 eggs
  • 1 teaspoon garlic powder
  • 1 teaspoon ground cumin
  • 1 teaspoon onion powder
  • 1 teaspoon chili powder

Heat up your waffle iron while you combine the ingredients.   Our waffle iron doesn't have any settings, just plug it in and it's on. The light turns off when it's at maximum temperature.
Sonny D using the whisk, his favorite kitchen implement!
Mix up the eggs and seasoning. Spray your waffle iron with baking spray (I use Trader Joe's olive oil spray but also like their coconut version) and pour in about 1/4 to 1/3 cup of the egg mixture and close the lid.  

Puffy egg.
The egg will puff up from the steam and push the lid up, so you'll have to use this first one as a test to see how much egg your waffle iron will hold. As you can see from this photo, we had extra egg come out the back on our first one. 

They were cooked in about 1 minute, but of course your iron will probably be different. Using a fork, delicately pull out the omelet and put it on a plate.  Husband Jeff put shredded cheese on top and folded them in half to melt the cheese.
Adding shredded cheese and then folding in half
Husband Jeff and I put salsa on ours. 
I elegantly dumped salsa on top.

Verdict


Sonny D had a great time making the eggs, he absolutely loves using a whisk.  It's always the first thing he wants to pull out to help me cook, so I have to explain that sometimes a different tool works better like the hand mixer.

The brown color was deceiving, it looked like a waffle but you had to remind yourself that you were eating eggs instead. I liked that the texture was solid.  Light and fluffy eggs are great too, but this turned it into something different.

Sonny D ate his with just cheese inside, it was solid so it was pretty easy for him to pick up like a sandwich.  I don't know if he catches on to the novelty of making eggs in the waffle iron, but he really seemed to like it. We had one extra folded egg omelet with cheese inside left over, so I put that aside for Sonny D's lunch today.

The only thing is that it might have been a lot of garlic powder and onion powder in the mixture, so you might want to go a little light on that, but even as written it's great.  I can't wait to try this with other ingredients.  You could keep the Mexican theme by adding a bit of leftover taco meat and similar things, or take it into classic omelet territory with ham and peppers and onions. 

The only drawback to using only eggs is that it deflates down to be quite flat, it just cosmetic though.  Adding ingredients to the omelet itself would remedy that. 

Wanna Chat?

I turned off the 'leave a comment' feature, so if you want to share what you're thinking about this or anything else, drop me an email at jhk1013 (at) gmail.com. It's so much more cozy than a comment, plus we can have a real conversation!

Sunday, February 16, 2014

Quick Inspiration: Taco Bites

I'm just going to point you in the right direction because the concept for this dinner is flexible enough to let you make it your own thing.  Plus this is a weird combo of two different recipes that I am just dying to tell you about!  I didn't know if it would work out, so I didn't really document it. 

I started this dinner idea by wanting to use the 'heart smart' Bisquick baking mix we've got open and rarely use.  We used to use it for pancakes and other random things like biscuits, but I've found Kodiak Cakes flapjack & waffle mix, which I like better for pancakes.  It has whole grain wheat flour, oat flour, and just a few other ingredients, no weird chemicals with unpronounceable names.  But anyway, back to the Bisquick.  We might as well use it up in other dishes since we don't use it for pancakes.  There's a recipe from Better Crocker/Bisquick called impossibly easy mini cheeseburger pies that I wanted to try.  You use ground beef along with some other ingredients to make mini savory pies... and luckily we had some leftover ground beef!  Well, not so lucky when I looked in the freezer and realized it was very little meat, only about 1/2 cup.  Barely enough to do anything!  Certainly not enough for this recipe.  So then I needed to do a little problem-solving to figure out how to make this into a full dinner.  Some of the reviews for the mini cheeseburger pies said that the flavor was extremely boring, so I was happy to twist it to be taco pies instead to add more pizzazz. 

Shown in my hand for perspective, standard muffin size. 
You are totally not going to believe how I came up with enough filling to make these pies a meal... I remembered a recipe I had actually made fun of to my friend Chuck (vegetarian), Grape-nuts as taco filling.  I threatened to make him that for a taco feast, but after reading the positive reviews, I was intrigued.  How does an extremely crunchy breakfast cereal get turned into a savory Mexican meal?  Add salsa and taco seasoning, I guess. 

So I heated up my meager amount of pre-cooked ground beef, sauteed some peppers and onions, and added the salsa, taco seasoning, water, and cereal. As long as you didn't stir it too much, the granules of cereal stayed whole and actually looked like meat.  And even though Grape-nuts are sweetened, it wasn't sweet at all. I had Husband Jeff taste the leftover filling as he came in the door and he said it was great and I had to confess that it was Grape-nuts. 

I mixed up the Bisquick as indicated, added some chili powder and cumin to flavor it, and measured it out into the muffin pan.  I used my taco"meat" as the filling along with some shredded cheese.  Another dab of the baking mix batter on top and threw it in the oven.  Out came these adorable little filled savory muffins!   

A taco mini "pie", cold from the fridge, cut to show the interior.

They were great the first night, and just as excellent as leftovers for lunch the next day. 

Hot from the microwave with smashed avocado and salsa on top. 
I was so happy that they turned out so tasty and I was able to use up that little bit of meat and also find a new use for my Grape-nuts.  Plus Husband Jeff and I love Mexican food!  

You could probably make these in a mini muffin pan if you wanted to make them as an appetizer. I've also got a recipe bookmarked where someone used the same basic concept but made them into a mini handheld breakfast dish by putting various things in them.  Her family favorite was one with sliced banana in it and pancake syrup in the batter.  I want to try the same thing by mixing a little cinnamon, vanilla, and some mashed banana into the batter and add chopped pecans along with the slices of banana. 

So the moral of the story is to think outside the (cereal) box and give a new recipe a shot!  Don't be afraid to try a new concept, it might be your next great dinner! 

Wanna Chat?

I turned off the 'leave a comment' feature, so if you want to share what you're thinking about this or anything else, drop me an email at jhk1013 (at) gmail.com. It's so much more cozy than a comment, plus we can have a real conversation!

Tuesday, February 4, 2014

No Fear Here: Beef Tenderloin

I've always wanted to make a beef tenderloin, but it scared me because it's such an expensive cut of meat.  If you screw it up, there goes a lot of money.  Our local meat market (Jim's Meat Market on Madison's north side) was having a holiday special, beef tenderloin for $9.99/pound.  I was originally going to buy it before Christmas, but I chickened out.  Then I made the decision to conquer my fears and finally bought it right before New Year's Eve.  They only had 3+ pound roasts in the case, but I wanted a 2-pound roast, so they specially cut, tied, and seasoned a 2-pound roast for me. Such great customer service!  If we want something that's not in the case, they're always willing to go in the back and get it for us.  And they make their own brats, we totally love their jalapeno & cheese brats and gyro brats (we ask for crumbled feta and gyro sauce for them). 

Well, anyway, it turns out there was nothing to be afraid of!

I feel that the one key piece of equipment is a remote temperature probe so you're not opening the oven to check the temperature all the time.  You insert the probe into the food and it has a long cord that comes out of the oven and connects to a timer/thermometer.  Mine is on the slightly fancier side and you can set it to alert you when the food reaches a certain temperature.  It works great, when you actually turn that feature on!  I meant to, but luckily I happened to catch my roast at 132 degrees, only two degrees higher than I wanted.

Inspiration

Christopher Kimball Blog (from America's Test Kitchen) simple beef tenderloin

Ingredients

  • 2-pound tenderloin roast, seasoned and tied
  • fresh black pepper (yes, my roast was seasoned, but I definitely wanted to add more fresh pepper)
  • 2 Tablespoons butter, softened
  • 1 Tablespoon vegetable oil

Directions

This wasn't in the recipe I followed for the cooking instructions, but I had another Cook's Illustrated tenderloin recipe that said said you should leave the roast sit out at room temperature for two hours before cooking to take the chill off.  I've heard you should do that with most meat so we do that for burgers, etc.  

After the two hours of resting is up, preheat your oven to 300 degrees.
Long raw tenderloin. 
Spread the unsalted butter on the seasoned roast, place it on a wire rack set inside a rimmed baking sheet.   Insert a temperature probe and set it to alert you when it reaches 120 degrees for medium-rare /130 for medium.  That's 5 degrees less than the actual "doneness" temperature because the residual heat will carry it over as the meat rests.  Roast.  Flip the roast about half-way through cooking (around 25 minutes of cooking). Mine took about an hour total to get to 132 degrees. 

Once the roast is to the desired temperature, remove it from the oven.
Just finished from the oven.
Heat the oil in your largest heavy skillet over medium-high heat.  Sear the roast on all four sides, about 1-2 minutes per side. This part was difficult because it was a long, unwieldy chunk of meat, but I did my best. 
Out of the oven and into the frying pan.
After searing, transfer it to a cutting board and let it rest 15 minutes.  While it rested I didn't cover the tenderloin with foil or anything since it didn't say to.  
resting meat.
Remove the twine and cut it cross-wise into serving slices. 
My beautiful medium-rare cut.

Verdict

Wow, impressive and super easy!  

We had Husband Jeff's parents over for dinner and everybody loved this.  I was so proud!  I will definitely make this more often in the future but I will wait until it's on sale. :)

Wanna Chat?

I turned off the 'leave a comment' feature, so if you want to share what you're thinking about this or anything else, drop me an email at jhk1013 (at) gmail.com. It's so much more cozy than a comment, plus we can have a real conversation!