Showing posts with label vegetarian. Show all posts

Tuesday, August 25, 2015

Porridge for Biz

This past weekend I met up with Biz from My Bizzy Kitchen and a few of her blog readers. (Read about our day on her August 24 blog post.)   I mentioned to Biz that I've been making a quinoa porridge for breakfast, so I thought I would share the recipe here for everyone else as well.  I use quinoa because I want more protein so I stay full all morning.  It's working pretty well but occasionally I add some nuts or seeds, like pumpkin or sunflower seeds. 
  • 1 c. quinoa 
  • 1/2 c. buckwheat or any other grain/legume
  • 1/3 c. hemp seeds    
  • 1/4 c. ground flax seed
  • 3 Tb. chia seeds
  • 5 cups water
  • seasoning - couple tablespoons of cocoa powder, heavy sprinkle of cinnamon, etc.
I put everything in my small slow cooker (6 qt) and let it cook overnight.  In the morning I divide it up into 6 portions.  It makes large portions, which I love.  I typically add some fruit, lately it has been a couple of plums diced up. 
   
I really don't like the flavor of quinoa, so I prefer to cover it with a strong seasoning.  Cocoa powder is a good way to do that.  I've also tried adding red lentils, but it ends up too "bean-y".  Bleh.

Wanna Chat?

I turned off the 'leave a comment' feature, so if you want to share what you're thinking about this or anything else, drop me an email at jhk1013 (at) gmail.com. It's so much more cozy than a comment, plus we can have a real conversation!

Wednesday, May 6, 2015

Ready In Seconds, Seriously! Homemade Mayo

I've had some people (particularly my friend John) interested in my homemade mayonnaise I've been using for our Whole30 cleanse so I made a quick video to share with you.

I follow the Everyday Maven mayo recipe because it has instructions for using an immersion blender, which gives amazing results pretty much every time.  And as you can see in the video, it's pretty much instant! 

Please forgive the shortness of the video, I recorded it with my phone and it tipped over before I was finished because of the immersion blender's vibrations on the countertop.  But as you can see, it turned to mayo in just a few seconds.  All I did to finish was to bring the immersion blender up to incorporate the oil sitting on top.  So quick! 

The most important thing to do is to use LIGHT olive oil.  Regular extra virgin olive oil is to olive-y and strong, what you need is a really light oil so it doesn't give too much flavor.   I would recommend a touch less salt, this was my first time using the Himalayan pink salt and this batch turned out a little more salty than expected.  If you're following Whole30, you should use plain mustard or mustard powder because Dijon mustard has white wine, which is not Whole30-approved. 

I've read that to make a smaller batch, you use just an egg yolk (save the white for your next omelet) and whatever amount of oil you want, like 1/4 to 1/2 cup.  But I say go for a whole 1 cup batch, this stuff is so good!  I eat it on everything these days. 

And I follow the advice that it lasts longer than one week, in my book it should last for as long as your egg.  I'm also using a farm-fresh egg that I bought at the farmers' market, really good quality. 

Wanna Chat?

I turned off the 'leave a comment' feature, so if you want to share what you're thinking about this or anything else, drop me an email at jhk1013 (at) gmail.com. It's so much more cozy than a comment, plus we can have a real conversation!

Thursday, October 23, 2014

Makin' It At Home: Citrusy Kale-Quinoa Salad

This dish was inspired by a salad that my friend Chuck picked up at the deli for a party at his house.  I ended up eating a large portion of the salad (um, most of the container) and was determined to make my own since I enjoyed it so much.  At the party I snapped a photo of the ingredients list on the package so I could copy it, but of course now I can't find that photo.  Whatever, no biggie.  It was tasty, that's what really matters.  I love the crunchy nuts, the puckery citrus dressing, the earthy quinoa, the sweet fruit, savory onions, and tangy feta.  It all comes together in a great salad.

When I got home I did some searching online and found this recipe from The Kitchn that seemed really close, so I copied it and modified it to match the salad we had. So this recipe is for Chuck because he likes the salad too, and wouldn't it be nice to make it at home for less money?  Plus it's a flexible recipe, using what you might have on hand. 

This recipe comes together in four separate parts -- the onion, the quinoa, the kale & other stuff, plus the dressing. I made this two times, the first time I had walnuts and feta, the second time the feta was all gone so I added some additional lemon juice. Feel free to make it that way if you want a dairy-free/vegan version. 

Inspiration

The Kitchn kale quinoa salad with citrus dressing

Ingredients

Onion

  • 1/2 onion, diced
  • 1 Tablespoon olive oil
  • 1/4 tsp salt
In a medium skillet saute the onion for 20 minutes on medium heat.
beautiful caramelized onions.

Quinoa

  • 1/2 cup quinoa
  • 1 clove garlic, minced
  • 1 cup water
  • 1/2 tsp salt
  • 1/4 tsp dried lemon peel (totally optional, I only added it because I had it)
In a small pot bring all of the ingredients to a boil, turn the head down to low, cover and cook for 15 minutes. Once 15 minutes is up, turn the heat off and let it sit 5 minutes to finish absorbing the liquid.
quinoa on to boil.

Kale & other stuff 

  • 1 bunch kale, finely minced
  • 1/2 cup dried fruit (I used raisins because that's what I had, but the original dish had craisins)
  • 1/2 cup nuts, chopped and toasted in dry skillet (I used walnuts the first time and sliced almonds the second)
  • 1/4 cup crumbled feta (optional if you want it vegan/dairy-free, but then add another 1-2 Tablespoons lemon juice for tanginess)
To prep the kale, remove the leaves from the stems and toss the stems if they're really tough. Then roll the leaves up the long way and cut them into fine ribbons.
Final salad with the walnuts and feta. 

Dressing

  • 2 Tablespoons fresh lemon juice
  • 1/2 tsp honey
  • 2 Tablespoons olive oil
  • salt & pepper
In a large bowl mix the first three ingredients together and taste for salt & pepper. Then as the rest of the ingredients are ready, add them to the bowl as well. 
Final salad with sliced almonds and no feta.

Verdict 

I preferred the version with feta, but the version without it was fine too.

Wanna Chat?

I turned off the 'leave a comment' feature, so if you want to share what you're thinking about this or anything else, drop me an email at jhk1013 (at) gmail.com. It's so much more cozy than a comment, plus we can have a real conversation!

Thursday, October 16, 2014

Southwestern Quinoa and Black Bean Soup

Another requested recipe from my birthday party on Saturday was my Southwestern quinoa and  black bean soup.  I used a few online recipes as inspiration, but the final result wasn't really based on any one particular source, so this recipe is what I wrote down as my final dish in my new recipe notebook.  The notebook is a nice way to keep all of my recipes together rather than the scraps of paper in the junk drawer in our kitchen. I can't believe it took me this long to realize I should write down all of my recipes in a notebook to keep them all together. 

This soup is similar to chili, so you might want to serve it with traditional chili accompaniments like saltine crackers, cornbread, cheese, etc. 

Southwestern soup

Ingredients

  • 28 oz crushed tomatoes
  • 42 oz water or tomato juice
  • 15 oz tomato sauce
  • 14 oz petite diced tomatoes
  • 1/2 onion, diced and sauteed
  • 1/2 each red, yellow, and orange bell peppers 
  • 2 cups black beans (or a 14oz can)
  • 3 cloves garlic, minced
  • 1 Tablespoon cumin
  • 1 Tablespoon chili powder
  • 1/2 tsp oregano
  • 1 1/2 tsp salt
  •  1/2 cup quinoa

Directions

Put all of the ingredients into the slow cooker and cook on low for 8 hours.

Wanna Chat?

I turned off the 'leave a comment' feature, so if you want to share what you're thinking about this or anything else, drop me an email at jhk1013 (at) gmail.com. It's so much more cozy than a comment, plus we can have a real conversation!

Tuesday, October 14, 2014

Tae's Peas and Potatoes

At the party on Saturday, our friend Tae brought an awesome dish in the slow cooker, peas and potatoes.  She says, "It's my bastardized version of methi matar malai.  I find that it tastes better the longer it cooks, which is why the crock pot method is so nice."  It seemed like everyone at the party asked who made it and if they could have the recipe.  I also wanted to share it with everyone who reads my blog because I figure most people could stand to have more awesome and effortless slow cooker recipes. It's dairy-free, gluten-free, and vegetarian. 

From my research, the name "methi matar malai" translates to "fenugreek peas cream" and is a Punjabi north Indian recipe.  Here's Tae's recipe!

Ingredients

  • Large potatoes - 2, cut into chunks
  • Frozen Peas – 16 oz (1/2 kg)
  • Coconut milk – 1 14oz can (don’t use lite, use the full fat stuff)
  • Tomato – 1 can diced 14oz
  • Salt – to taste
  • Oil – 1 Tbsp
  • Ginger – 1 Tbsp, minced
  • Onion – 1 medium, chopped
  • Cumin powder 1 tsp
  • Turmeric Powder – 1/4 tsp
  • Coriander Powder – 1 tsp
  • Garam Masala – 1 tsp
  • Red Chili Powder – 1 tsp
  • Optional: Add fresh cilantro on top before serving
  • **Optional: add chicken

Crock Pot Method

Put the oil in the bottom of the crock pot. Add the onions, potatoes, peas, and tomatoes. Throw
in all the spices and add the coconut milk. Set on low for 8 hours. Serve over rice.

Stovetop Method

  1. Heat Oil in a medium pan on medium heat.
  2. Add onions and cook until a light golden color
  3. Add ginger and cook for 2 minutes
  4. Add all spices, potatoes, and tomatoes and cook for 2-3 minutes
  5. Add peas and coconut milk and simmer for 15-20 minutes until potatoes are cooked all the way through.
  6. Serve over rice. 
********
From my research, this dish can also have spinach in it to replace the fresh methi (fenugreek) leaves.   I would also add garlic, because I think it pretty much belongs in every savory dish.  And since I can't leave well enough alone, I would probably see if it would be good with a can of chickpeas mixed in, cauliflower florets, or maybe some cubed tofu.  I would also love to add some sliced mushrooms, but that's not going to happen with my family! 

I love Indian food and this inspires me to want to make some. Thanks for the recipe, Tae!

Wanna Chat?

I turned off the 'leave a comment' feature, so if you want to share what you're thinking about this or anything else, drop me an email at jhk1013 (at) gmail.com. It's so much more cozy than a comment, plus we can have a real conversation!

Tuesday, September 23, 2014

More Infused Liquor: Chocolate-Mint Vodka & Jalapeno Tequila

On Sunday I had some free time in the afternoon while Sonny D and Husband Jeff went to the park to play with our neighbors, so I decided to make some recipes I've had on my list for a while, chocolate-mint vodka and jalapeño tequila. This will go along with the spearmint vodka and cherry bounce I made earlier this year.  We're going to break them out at Thanksgiving with our friends, that's probably going to be a drunkfest.  :)


Chocolate-Mint Vodka

I finally went out to our garden to pick the chocolate mint for this recipe.  It's a hearty plant, still going strong despite growing without maintenance.

I picked all of the leaves off a few stems and ripped them a couple times to help release the oils, then put them in the jar.  I had no idea how much mint to use, so I just did it until I ran out of leaves and then covered it with vodka.  I used up the last of a bottle of vodka we had in our pantry and cracked open a new one I had purposely bought to make this recipe.  I wanted to use all of the vodka up so we didn't have any leftovers, but I ended up with a tiny bit that wouldn't fit in the jar.  Maybe I'll infuse it with another flavor.
Don't you love the classy homemade masking tape label!?

This will sit in our fridge to infuse for a week and then I'll strain off the mint.  I'm still not sure how we'll use this or the spearmint vodka I made, but I'm sure we'll figure something out.  Mint, lime, and rum go together to make a mojito, so maybe we'll make a variation on that with something like pineapple juice or coconut.  Or spiked hot chocolate.  Drizzled over vanilla or chocolate ice cream would be good too.  Mixed into hot tea.  Martinis. 

Jalapeño Tequila

I did a bunch of research to learn about tequila to come up with a list of possible brands/types to buy.  I ended up buying El Jimador tequila because it was highly ranked, available at the store I was in, and it's the type our friends Jim & Isabelle drink.  I tasted it straight before I added the jalapeno slices and found out that good tequila is nice!  There's a great smoky quality and it was actually enjoyable, not something you'd need to learn to appreciate like whisky.

I sliced up three jalapeños from our garden and put them in the jar and dumped the tequila on top.  It will infuse for about three-four days and then I will strain out the jalapeños.  I wonder if there's something I can do with those now-boozy jalapeños? 
El Jimador, gettin' spicy. 

I saved the bottle for this one so I can use a funnel and fill it back up.  I figured it will be easier to pour out of a bottle than a canning jar. 

This one seems like it will be easy to use, either straight shots of tequila or made into some sort of margarita.  Yum!  

Wanna Chat?

I turned off the 'leave a comment' feature, so if you want to share what you're thinking about this or anything else, drop me an email at jhk1013 (at) gmail.com. It's so much more cozy than a comment, plus we can have a real conversation!

Friday, September 5, 2014

It's Like Magic! Pressure Cooker Baked Beans

A can of baked beans is easy and great. Open it up, heat it, spoon 'em on your plate.  Perfect for a night when you're grilling and need a quick and simple side dish.  I never even considered the idea that you could make your own, not sure why that had never occurred to me.  But a few months ago I encountered recipes to make them completely from scratch and decided that I needed to try it.  

So I made baked beans for the Fourth of July and it was awesome.  My original intention was to make them in the slow cooker so I didn't have to do a lot of last-minute cooking, but my mom mentioned she had trouble making beans from scratch in the slow cooker, that they never fully softened.  So I changed my plans and made them right before the party in the pressure cooker instead.  They turned out so good that I decided I would make them again for my brother-in-law's 40th birthday last weekend.  

Quick Pressure Cooker Overview

http://www.hippressurecooking.com/infographic-pressure-cooking-saves-time-energy-and-vitamins/
Pressure cooking can save you time, energy, and vitamins.
Check out the pressure cooker infographic for more details.
After my last post about pressure cookers, my friend Josie of YumYucky asked for a a primer on them since she wanted to know more about the whole concept.

A pressure cooker is a sealed cooking vessel.  When you cook with it, the closed container plus the boiling liquid creates higher pressure (up to a certain amount, anything above that is let out).  That higher pressure means faster cooking because the steam penetrates into the food faster.  By cooking faster, it means you use less cooking fuel or energy, so it's very efficient and earth-friendly.

The quick-cooking factor means a huge chunk of meat is done in minutes, not hours.  Same with beans, skip the overnight soak and you can go from dry beans to fully cooked in about 20 minutes.

This method works well for recipes that involve moist cooking, so pretty much anything you can do in the slow cooker can be converted to the pressure cooker.  

And today's models are definitely safe.  They use pressure regulators to ensure the pressure doesn't get to high, and special locks to ensure you can't open it until the pressure reduces. 

The pressure cooker is best for people who don't plan ahead.  That's right slackers, this is one place where you're not behind. When I talked about making the baked beans in the pressure cooker, one family member mentioned he can take a roast right from the freezer and turn it into dinner in less than an hour. 

Back To The Dish

The night before the birthday party, I had a panicky moment while falling asleep when I worried about whether I needed to soak the beans overnight (you do not).  I was so tired that I mentally shrugged (and probably physically as well) and figured I would deal with it in the morning.  Then on the day of the party, I had another panicky moment when I couldn't find the scrap of paper with my scribbled Fourth of July recipe notes.  I have a drawer full of printed-off recipes and random scraps of paper with recipes, but I couldn't find that particular one. Of course I found it later, after I didn't need it.  I was able to manage without it by referencing the recipes I had bookmarked and one of my pressure cooker cookbooks.  The recipe I came up with is close to this slow-cooker baked beans from Eating Well. 

I made this batch without any bacon because we had a vegetarian friend coming to the party, plus I didn't have a full pound of bacon that I had previously deemed necessary for the dish.  On my first try I had only used half a pound because that's what the recipe stated, but you could barely tell it was there.  
Dry beans go in the pot, no overnight soaking.
After the 23 minutes of cooking in the pressure cooker, I transferred the now-cooked beans to my medium slow cooker and added the sauce ingredients. I prefer less-sweet baked beans, so I skipped most of the sugary stuff and went only with a bit of molasses.  And used plain tomato paste instead of ketchup. Since I had skipped the bacon, I added a heavy sprinkle of smoked paprika for that smokey touch. And definitely tasted it a few times after mixing all the sauce ingredients to adjust the spices and flavors.   Then I let it cook away a few more hours until the party. 
Finished baked beans.
I received loads of compliments, which made me so happy.  The vegetarian friend said they were the best baked beans he had ever had, which was great.  And my father-in-law Ken always compliments my cooking, which I really appreciate. 

This reminds me that I need to pull out my pressure cooker more often, it's so handy! Plus utterly fascinating, I think the science behind it is amazing. 

Wanna Chat?

I turned off the 'leave a comment' feature, so if you want to share what you're thinking about this or anything else, drop me an email at jhk1013 (at) gmail.com. It's so much more cozy than a comment, plus we can have a real conversation!

Thursday, August 28, 2014

Hopefully It Tastes Good: Pickled Eggplant

Last night I canned pickled basil-garlic eggplant cubes from The Joy of Pickling book.  I have absolutely no idea what it's going to taste like since I've never had pickled eggplant, but I figured I would try it out.  I don't know how this recipe will taste since you need to wait a week before you eat them. 

It wasn't from a small-batch canning book, but it ended up being smaller rather than larger.  It only took two eggplant and made 5 half-pint jars.  It was supposed to make 6 jars, but that last one wasn't full enough and the others needed more, so I used that less-full jar to get the others filled to the top. 
Blanching the eggplant cubes in vinegar. 

The recipe was really quick, I was done in less than an hour.  It took me about 15 minutes to pull out the jars and lids, find all the rest of my canning equipment like the jar lifter and funnel, and set up my cooking equipment.  I made one substitution, the recipe called for white wine vinegar, which I didn't have because when I originally skimmed the recipe, I thought it said regular white vinegar.  The flavor will be a bit more plain, but that might be ok. 

I tried a new trick for canning this time.  Usually it's recommended to use a rack in your water bath to protect the jars from bouncing around as they boil, but I don't have a rack so I added a silicone potholder to the bottom of the pot.  I don't actually like the silicone potholders to lift things since they seem slippery and I don't feel like I have a good grip on stuff, so this was a good way to use it.  The only other way I use them is occasionally as trivets, but even then I'm not fond of them since they're not very thick and I'm afraid the hot dishes are still too close to the table/counter and will cause damage. 
Blanched eggplant cubes mixed with garlic and basil.

I'm glad I'm comfortable with canning now, I understand the process and I know what I'm doing.  I think my first time canning took a few hours because I had to read and re-read the instructions several times to ensure I wasn't going to make a mistake.  Now I'm a lot more confident and it flows really well.
Steamy canning process.
I especially like that it wasn't a big batch so I could put it in a few small jars and wouldn't end up having to open a huge jar of pickles and then take forever to eat it. 
Sonny D and Husband Jeff sharing a carrot from our garden.
While I was cooking this up after dinner, Sonny D and Husband Jeff were out around the neighborhood having fun.  Their route back home took them through the back yard and they picked  a carrot in our garden.  (the only one big enough to eat!)

One garden thing I need to remember for next year is to definitely put plants into tomato cages or tie them up to a trellis for support.  So many of our plants are drooped over on the ground and all our good food is going to waste while the animals eat them.  And the Asian beetles completely ravaged all my basil.  Last year we had an amazing bumper crop of basil, this year it looks like I will barely have enough left to make a decent batch of pesto after I harvested a bit for this recipe. 
The final product. 
My next pickling adventure is spicy pickled jalapeños. Those should be fun. 

Wanna Chat?

I turned off the 'leave a comment' feature, so if you want to share what you're thinking about this or anything else, drop me an email at jhk1013 (at) gmail.com. It's so much more cozy than a comment, plus we can have a real conversation!

Thursday, July 31, 2014

Great-Aunt Pooch's Cherry Bounce

I sat down last night with a quart of cherries and made them into something tasty... but I have to wait for three months before they're really ready to eat!  I made cherry bounce, an old-fashioned Wisconsin tradition that I'm finding not many people know about.  And I'm aiming to change that, at least in our group of friends.  Gotta start small!   

Cherry bounce is sour cherries soaked in booze, typically whiskey, bourbon, or brandy.  I went full-on "Sconnie" on this and used Korbel brandy, the number one brandy in the state.  (Read about brandy being super-popular in Wisconsin but nobody seems to know why.)  I used brandy so we could use it to make brandy old-fashioneds, plus I don't like whiskey or bourbon. 

Even though cherry bounce is a simple recipe — cherries, booze, and sugar, it requires a lot of patience to wait until they're fully marinated.  It's definitely a gamble. I have no idea what I'm doing since I've never made anything like this before and only tried it at the Tip Top Tavern this weekend (they had a homemade cherry brandy old-fashioned as their drink special, yespleasethankyou!). I hope this works out.  Oh, and you don't refrigerate it, you just throw the cherries in a jar with a bunch of booze and sugar, which are both preservatives, so it ends up that I'm making pickled cherries! Who knew!

Inspiration

Island of Consumption Door County Cherry Bounce 

The great-aunt Pooch in the title isn't my great-aunt, nobody in my family made anything as cool as this.  The recipe I followed described great-aunt Pooch, so I borrowed it because I thought it gave the aura of a time-tested recipe passed down through generations. 

I picked up the sour cherries at our Northside farmers' market on Sunday, the cherries come from Sturgeon Bay (way up north).  I was a little hesitant about the unknown sour cherries and really wanted to use the yummy sweet cherries we always get, but the guy at the stand reminded me that cherry bounce is typically made with sour cherries, so I conceded and went the traditional route.  I had never had a sour cherry, they're not particularly sour, just not as sweet as the big dark Bings.  The sour ones are definitely smaller though.
Difference between a sour Montmorency cherry (left) and a sweet Bing cherry. 
I used a toothpick to poke a couple holes in each cherry and then drop it into one of two freshly-washed big quart jars. It took 20 minutes to work through all of those cherries, but it was meditative. I had to be careful though, I was afraid I'd poke my fingers by mistake since the cherries were so small. As I did it I was kind of questioning why I was putting holes in them, but I realized that there needed to be a symbiotic flavor exchange while they marinated for three months, the brandy needs to get into the cherry and the cherry flavor needs to get out into the brandy.

Oh yeah, and the cherries aren't pitted, the recipe specifically said "unpitted cherries", so they're going to be a bit dangerous to eat.  There are dishes made with unpitted cherries because the pits supposedly add extra flavor, so I went along with it based on that concept.
Armed with a toothpick to poke holes. 
I added 1/3 cup sugar to each jar since I read that brandy is likely sweeter than whiskey.  It might not be enough sugar, but we can always add more later. 
Adding sugar with my canning funnel.
Thanks for the funnel, Mom!
Then I topped off both jars with most of a bottle of Korbel brandy and added a broken cinnamon stick to one jar for some flavor variety. I gently shook them a few times to mix in the sugar, but it was slow to dissolve.  I'll probably  I finished off by making my standard fancy-scmancy kitchen labels with masking tape and a marker. Classy! 
A jar of regular and a jar of cinnamon.
Then I put both jars up out of the way on the top shelf of the pantry to rest. Sleep my babies, I'll see you in three months!

Wanna Chat?

I turned off the 'leave a comment' feature, so if you want to share what you're thinking about this or anything else, drop me an email at jhk1013 (at) gmail.com. It's so much more cozy than a comment, plus we can have a real conversation!

Friday, June 20, 2014

Marinated and Grilled Mushrooms

This recipe didn't come from my stash of bookmarks, it was something I looked up on the spur of the moment and I'm so glad I found it!  It was seriously so good! I made this recipe just for myself since nobody in my family eats mushrooms, but as I was eating the leftovers I offered a mushroom to Sonny D.  He didn't want one but he changed his mind once they were all gone.  Too bad, buddy, should have moved quicker. 

The big tip for this recipe is starting the skewers to soak ahead of time if you've got bamboo ones.  I put mine in a 2-quart pitcher of water and put the lid on to keep them submerged.  And luckily mushrooms don't need a ton of cooking so if you don't get a super long soak they should still be fine since they won't be on the grill long enough to get super charred. 
 

Inspiration 

Natasha's Kitchen grilled mushrooms on skewers

I skipped the parsley and the instructions to whiz it up.  And I substituted Korean red pepper flakes (gochujaru) for the cayenne pepper. 

Ingredients

  • 1/4 cup olive oil
  • 1/4 cup lemon juice
  • small handful of parsley (I skipped this)
  • 1 tsp sugar
  • 1 tsp salt
  • 1/4 tsp pepper
  • 1/4 tsp cayenne pepper  (I replaced this with a sprinkle of gochujaru)
  • 1-2 garlic cloves (mine was minced from a jar)
  • 1 Tbsp balsamic vinegar
  • 16 oz button or baby bella mushrooms

Directions 

Put together all of the marinade ingredients and the mushrooms in a bowl or zippered bag and marinate for at least 30 minutes.  I put my mushrooms in the marinade over lunch and grilled them up for dinner, so mine marinated for several hours.

Soak your skewers now too if you've got bamboo ones. 
Mushrooms marinating
Preheat your grill to medium-low heat, about 300 degrees.  Thread the mushrooms onto the skewers and grill for about 3 minutes per side. 
After grilling.  Not attractive, but sooo tasty!

Verdict

So incredibly good!  I had to exercise my amazing willpower to not eat the whole pound at once and save half for the next day.  I love how simple the marinade is, it's things you

I ran out of lemon juice making this recipe so I couldn't make this same marinade, so a few days later I made an Asian marinade for another batch of mushrooms.  While the second one was quite good, it wasn't as amazing as this one.  We bought another bottle of lemon juice, but now I'm running low on balsamic vinegar.  I definitely need to make sure I'm well stocks on all the ingredients because I'm pretty sure I'm going to make this recipe all summer!

Wanna Chat?

I turned off the 'leave a comment' feature, so if you want to share what you're thinking about this or anything else, drop me an email at jhk1013 (at) gmail.com. It's so much more cozy than a comment, plus we can have a real conversation!

Tuesday, June 10, 2014

A Good Long Soak: Soaked & Fermented Oatmeal

The whole reason I created a sourdough starter was to use it to ferment my oatmeal rather than using a dairy product like yogurt since I've found that I really don't care for milk/dairy.  Some say soaking grains increases nutrient content and makes whole grains more digestible.  I figured I would give it a shot to see if I noticed a difference. And the sourdough starter has been a fun experiment and a reason to make some new things like sourdough crackers and pizza dough. 

It took a while for my sourdough starter to actually be a full-grown starter and then it took me even longer to actually feel comfortable enough to try it out on my oatmeal.  I'm not sure what I was afraid of, but I was generally hesitant.

The Process

I typically cook up a 5-serving batch of my oatmeal overnight in my small slow cooker so I can have oatmeal for a few days.  The day before I want to cook my oatmeal, I measure out the amount of rolled oats and steel-cut oats and put them in the in the slow cooker with the right amount of water.  My current recipe is 1 cup rolled oats, 1/2 cup steel-cut oats, and 3 cups of water.  Then I pull Billy Jean (sourdough starter) out of the fridge to add a spoonful and let the batch sit out on the counter until I'm ready to cook it.

It doesn't really look much different than a normal batch, you wouldn't be able to tell it was different other than a milky look to the water from the flour. There's a slight smell from the fermented sourness, but it's pretty similar to the smell of fresh bread dough.  Kinda yeasty and warm.
Adding a spoonful of gloppy sourdough starter.

Spoonful of oats. 
Let it soak for the desired amount of time. And this is where things can get different.  The first time I tried it, I soaked it for about two days, mainly because I wasn't paying attention and I didn't think it would be a big deal. Well, it totally was a big deal, the resulting oatmeal was so sour! It was as if I had made it with a huge dose of tangy buttermilk. Not enjoyable. I still ate it, but I made a note to never soak it that long again. Bleh.

The next time I soaked it for about 24 hours.  That was fine, a tiny bit sour but barely noticeable after I add fruit and cinnamon and whatever else to my bowl of oatmeal. 

I think I've finally got it adjusted down to where I like it.  I soak it for about 12 hours before cooking, so the morning that I finish up my last serving of oatmeal from the fridge, I set up a batch to soak and then cook it that night. 

Verdict

Is it worth it?  I don't know.  I don't think I feel any different after eating it.  I'll keep soaking/fermenting my oatmeal for a while and then if I feel lazy I'll skip the soaking for a batch to see if I feel a difference.

Wanna Chat?

I turned off the 'leave a comment' feature, so if you want to share what you're thinking about this or anything else, drop me an email at jhk1013 (at) gmail.com. It's so much more cozy than a comment, plus we can have a real conversation!

Thursday, June 5, 2014

Grilled Homemade Pizza

This was some heavy-duty pizza making but I had fun rising to the challenge.  Over lunch I made my own pizza dough using part of my sourdough starter.  I enjoyed kneading the dough while I watched a TV show on my iPad.  Then after work I mixed up my own pizza sauce, not because I'm aiming for a "super cook of the year" award, but out of necessity since we didn't have any canned pizza sauce in the pantry and Husband Jeff declares there's a huge difference between spaghetti/marinara/pasta sauce and pizza sauce.  But the sauce was really easy, it's pretty much just tomato paste and spices.

Once all of the toppings were ready, we preliminarily grilled the crust, topped it, and then put it back on to finish cooking and heat up the toppings. I'm glad I didn't make the sausage or the cheese, but rest assured, I do have two mozzarella cheese making kits, so it's possible! 
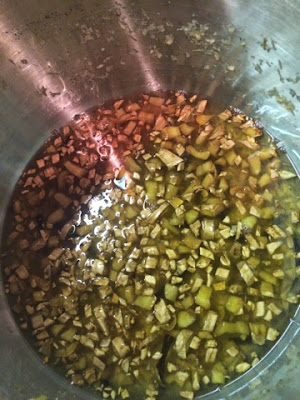
Messy homemade pizza sauce. Should have used a bigger bowl.
Of course you don't have to make your own crust, you could use one of those pre-cooked Boboli crusts (use medium heat since you're just warming it) or buy some Trader Joe's premade refrigerated dough.  But if you want pizza tonight and don't want to go to the store, here's a quick 10-minute, four ingredient pizza dough recipe. It doesn't require a lot of kneading and uses a bottle of beer instead of yeast.  I've made it before and it's quite good.

I'm going to cover the general grilling part of the pizza so you understand the concept, but also included the recipes for the pizza crust and the sauce in case you want to try those as well.  

Inspiration

I put only half of the pizza sauce on the pizza since the grilling instructions said not to load it up with sauce or it would get soggy.  I heated up some of the remaining sauce for Husband Jeff so he could dip his pizza since he likes a lot of sauce.

You can make this vegetarian by using your favorite vegetarian pizza toppings.  It can also be dairy-free if you leave off the cheese.  Once upon a time I had an awesome tuna and artichoke pizza that didn't have cheese or red sauce.  So incredibly good.  Maybe a hummus sauce and topped with tuna and artichoke hearts?   Or cheese-free pesto with chicken and tomato slices?

Directions

Set up your grill for medium-high heat. 

Pat/stretch the dough until you get the thickness you want.  For grilling I recommend a thinner crust to ensure it gets fully cooked in the middle.  This is not the time for a thick pizza. We have a wide gas grill, not a round kettle charcoal grill, so a long pizza worked out fine.  If you have a round grill, aim for a rounder crust. I'm terrible at rolling out baked goods in a desired shape, I just aim to get it the right thickness.

My dough wasn't sticky, so I was able to roll it out with my rolling pin on my big baking sheet.  I sprinkled the baking sheet with a bit of flour to ensure we could slide it off when the time was right. 
Rolling out the dough.

While the grill was getting up to temperature and Husband Jeff cleaned it off and oiled the grate, I cut two Trader Joe's sweet Italian sausages into rounds.  The sausages are already cooked, but I heated them them in a pan to ensure they got a little brown.   I also chopped up some green olives and pulled out the frozen shredded cheese to let it defrost a bit. 
cooked up the pre-cooked sausage
When the grill is ready, transfer the crust to the grill and cook for about 2 minutes. Thee crust stuck to the baking sheet a tiny bit on one side, but we were able to get it on the grill without any real issues.  After the two minutes, use a pair of tongs to turn the crust 90 degrees and cook it for another minute to get pretty cross-hatch grill marks. Our grill was quite hot and we had to pull it off before the time was up to ensure it didn't burn. 
First grilling of the crust.  A tiny bit darker than I like.
The instructions said to spread the browned side of the crust with olive oil, but I don't know what good that did.  I followed it anyway.  Butter would be good too.
Husband Jeff enjoying wine on the deck while the grill heats up.
After a slathering of olive oil on the grilled side of the crust, add the sauce and toppings on the grilled side as well.  The ungrilled side will go down on the grill so it gets some color (ours got a lot, almost burned that side too!) and close the lid to ensure the toppings get warmed up and the cheese melts.
Finished pizza.  No green olives on Sonny D's side.

Verdict 

Next time we'll turn the grill down, it was really hot.  I would also like to season the crust more, maybe with some herbs and spices but possibly also more salt.  I wish we had a charcoal grill to add that awesome charcoal flavor, but I do like the quickness and ease of lighting up a gas grill.

The instructions I followed for grilling the pizza were kind of confusing and I had to check them several times to make sure I understood what was going on.  It's actually really simple:
  1. Put the raw crust on the grill, cook for about 2 minutes.
  2. Take crust off the grill, flip it so the grilled side is up and cover with sauce and toppings. 
  3. Put the pizza back on the grill and cook for 2-3 more minutes. Slice and enjoy.
I thought the pizza was fine, but I'm not a huge pizza fan.  Husband Jeff loved it and said it was almost as good as his favorite frozen pizza, Jack's rising crust. Sonny D ate several slices, so I think it was a hit with him too. Since I'm the cook, I used my choice of Trader Joe's sweet Italian sausage (love it!) rather than our usual pepperoni topping, but I would have also loved a bunch of mushrooms on it.  My guys are against mushrooms, so I chose to skip them for family harmony. 

Next time I would also look up how to make a chewy Neapolitan pizza crust.  I think that is allowed to rise and rest for at least two days, which I would hope would make it chewier. And probably adding some bread flour rather than all-purpose. 

Maybe next time I would go with smaller rounds of dough so we could each have our own pizza and it would be easier to manage on the grill.  The guys are pretty traditional with their toppings and I want different things, like maybe an Indian pizza with palak paneer, or eggplant and zucchini with mushrooms.  Or a Mexican pizza with enchilada sauce, beans, cheese, tomato, taco meat, and sauteed spinach. 

Wanna Chat?

I turned off the 'leave a comment' feature, so if you want to share what you're thinking about this or anything else, drop me an email at jhk1013 (at) gmail.com. It's so much more cozy than a comment, plus we can have a real conversation!

Tuesday, June 3, 2014

Made In The Pressure Cooker: Ginger-Vanilla Syrup

I saw this recipe mentioned in a pressure cooker newsletter a couple weeks ago and was immediately smitten with the idea.  I felt it was urgent to get some ginger immediately to I sent Husband Jeff a quick text message in case he went to the grocery store that day (he didn't).  It was right around Memorial Day weekend and I knew we were too busy to even deal with making this recipe, so I didn't push to go to the grocery store that night.  I ended up buying ginger a few days later and made it on Monday night. I was particularly inspired to make this recipe as soon as I could to show my friend Jessica since she bought her husband a SodaStream carbonated beverage machine but they've only used it a few times to make sparkling water but that's about it.  I'm guessing they don't know what to do with it other than using the pre-made flavorings that you can buy that go with the machine, so here's an idea.

This recipe originally called for 4 cups of water, but that version cooks for an hour to reduce down the liquid.  My version is made in the pressure cooker, where the water doesn't evaporate away much, so I started with the end amount of water. My pressure cooker needs only a minimum of 1/2 cup of water to reach pressure, so I had no problem reducing the water down to half the original recipe. 

The recipe didn't include vanilla, but this was the perfect reason to use up my remaining vanilla bean, it was a bit shriveled up and dried out.  I was saving it for making a special jelly, but I don't think I'm going to make any jelly this year, so I might as well use it here.

You can make this recipe without a pressure cooker, just cook it in an uncovered pot for 45 minutes to 1 hour, as described in the original recipe.  

Inspiration


Ingredients

  • 8oz ginger
  • 2 cups water
  • 2 cups sugar
  • pinch of salt
  • 1 vanilla bean, split (optional)

Directions

Wash and rinse the ginger. Slice the ginger into rounds and then chop some more into rough pieces. 

Add the ginger, water, sugar, salt, and optional vanilla bean to the pressure cooker.  Go ahead and turn the burner on now while you're stirring it all up.  Might as well save time if you can! 
Sugar, water, salt, and ginger all in the pot. 
Added a vanilla bean and stirred.

Lock the pressure cooker and set it to high pressure if you have that option.  Since it was such a small amount of water, it got hot pretty quickly for me.  Cook at high pressure for 22 minutes and adjust the temperature to keep it at high pressure.  In the first five minutes of cooking the awesome pungent smell of ginger filled our kitchen, but as it continued to cook it wasn't as fragrant. 
Pressure cooking. 
After 22 minutes, take the pressure cooker off the burner and do a natural pressure release, which is easy since you let it sit and don't do anything.  I let mine sit for a while to cool since I was off doing other things in the house. Remove the lid and take a look at the chopped bits of ginger.  Huh, not much different than when you put it in, just a little darker because you left the skin on. 
After cooking, this is what it looked like.
I poured the syrup through a strainer and funnel combo (strainer put in a funnel) to get it into Sonny D's little glass pitcher. 

Verdict

I mixed up a La Croix sparkling lime water with two tablespoons of the syrup so I could try it out before I went to bed.  I love it!  It's definitely got some ginger bite.  The next day I had another version with coconut sparkling water and it was great, too.   The vanilla bean flecks sink to the bottom of the syrup so you might want to stir it before pouring, but that's no big deal. 
Sparkling water + ginger-vanilla syrup = tasty drink!
I don't drink alcoholic beverages much, but I'm trying to come up with a recipe that would use this.  I would love a riff on the Dark & Stormy (ginger beer and rum).  I need to check out what alcohols we've got in the pantry to see what I can whip up.  
 
I've got some chocolate mint growing in the garden and no plans on what to do with it yet, so I think I'll probably end up making a chocolate mint syrup. That version won't need as much cooking, the recipes I'm finding say only 3-5 minutes of cooking on the stovetop.  You can also make fruit versions, which I'll probably try out this summer too.

Wanna Chat?

I turned off the 'leave a comment' feature, so if you want to share what you're thinking about this or anything else, drop me an email at jhk1013 (at) gmail.com. It's so much more cozy than a comment, plus we can have a real conversation!

Tuesday, May 20, 2014

Ruby Spring: Honey-Roasted Rhubarb Sauce

I bought a bundle of rhubarb at the Sunday farmers' market with no actual plan in mind, I just wanted to buy something fresh since it was finally there.  I made a rhubarb cake a couple weeks ago (using home-frozen rhubarb) and so we didn't really need another cake again so soon.  I don't have any other rhubarb recipes bookmarked and no other desserts I wanted to make, so I decided to turn it into a fruit sauce to use in my morning oatmeal.   Rhubarb sauce is also supposed to be good on ice cream, so I might try a spoonful that way.  My current favorite ice cream topping is peanut dust, what's left after Husband Jeff eats the huge container of store-brand peanuts from Target.  It is so perfectly nutty-salty with a tiny touch of sweetness! 

[Edited on July 2, 2014 to add microwave cooking instructions. See below!]

Inspiration

Cafe Zupas' honey roasted rhubarb

Ingredients

  • 1 bunch rhubarb (mine was 6 long stalks)
  • 1/4 cup honey
  • 2 Tablespoons orange juice

Directions

Preheat oven to 400 degrees. 

Microwave instructions - To make this in the microwave and not heat up your house, put the chopped rhubarb in a bowl with the honey and microwave for 3 minutes, stir, 3 minutes, stir, and then about 2 more minutes.  If you have a less powerful microwave (mine is heavy-duty) you might need to cook it a bit longer, but it's really quick. 

While the oven is heating up, cut the rhubarb into bite-sized pieces and put it into a glass 9x13 baking dish.  I had thoughts floating around in my head that rhubarb is acidic enough that you need to avoid metal containers, so I figured glass was probably a good safe choice.  Better safe than sorry.

And no need to worry about spraying the pan.  I gave it half a second of thought but went without and it was totally fine because it's so wet that it's not going to stick.   
Chopped rhubarb, oj, and honey.
Add the honey and orange juice.  My orange juice is frozen cubes from a pitcher I made several months ago (not homemade at all, completely from one of those frozen concentrate canisters).  All of the cubes froze into a big blob, so I had to whack the bag against the floor a couple times to break up the chunks. So classy.  One ice cube is approximately 2 tablespoons, so I just went with that. 

Bake for 15-20 minutes. 
After cooking 20 minutes.
I stirred mine after 15 minutes and decided to cook it another 5 minutes to reduce some of the liquid and fully soften the last couple of pieces.  I wish rhubarb was less wet so it could have browned like when you roast veggies.  I guess I could have put it under the broiler for a bit, but I'm slightly afraid of the powerful broiler, it's easy to let something go a little too long and burn it. 

Then I mashed the fruit with the back of the spoon and let it cool a bit. 
After mashing with that big serving spoon.  I don't like that weird pink and green color. 
As it cooled it unexpectedly thickened which was good because that's more of what I was looking for. And I don't know if it's because it cooled or what, but I was glad it turned more appealing pink color that the freshly-mashed dingy green and dull pink. 

After cooling a bit, I transferred it to a smaller container and tucked it into the fridge for later in the week. 
Beautiful ruby color of fresh rhubarb sauce. 

Verdict


I licked the spoon as I finished cleaning out the baking pan and liked what I tasted.  I'm glad I went with this recipe that used only 1/4 cup of honey, it was the right amount of sweetness and not too tart. Some of the other recipes I found used 1/2 cup of sugar, which would have been way too sweet.

I also liked that it added some orange juice for some variety in the flavor.   I wanted to add some vanilla extract and a touch of cinnamon, but I completely forgot since I was making this on my lunch break and I was watching the TV show Clean House on my iPad at the same time. I'll probably add a couple of teaspoons of my homemade vanilla (essentially vanilla vodka, a handful of vanilla beans in a bottle of vodka) and a sprinkle of cinnamon later. 

Wanna Chat?

I turned off the 'leave a comment' feature, so if you want to share what you're thinking about this or anything else, drop me an email at jhk1013 (at) gmail.com. It's so much more cozy than a comment, plus we can have a real conversation!

Wednesday, May 14, 2014

Condensed Soup Challenge: Transformed Into Alfredo Veggie Lasagna

This recipe was inspired by the lone can of Campbell's condensed cream of broccoli soup I had sitting in the pantry.  I had no idea why I bought it, it must have been for a recipe I was interested in a long time ago since I couldn't even recall buying it in the first place.  I figured I should probably use it up, which is usually a great way to provoke some creativity in the kitchen.  I started with my classic approach, search on the internet, this time looking for recipes using "cream of" soup. I found the shortcut alfredo lasagna recipe linked below, but decided it was healthier to make a version with a lot more veggies, regular noodles, and a lot less cheese.  Hopefully you find it motivating enough to make your own version!
 

Inspiration


Making The Dish

Our kitchen was chaos while I was preparing this recipe when I was home from work over lunchtime. I had three burners going at one time, was putting together two versions of the dish (one with mushrooms for me), and chopping up loads of veggies. I used an 8x8 baking dish and I think something like a 9x7. 
Sideways shot of my kitchen counter while working on this dish.
I made the alfredo sauce, but used only half the amount of milk and added the can of Campbell's condensed cream of broccoli soup. It was the perfect texture and I didn't need to change anything. 
Creamy layers.

I layered my new creation of broccoli alfredo sauce with lasagna noodles, bell pepper (cut paper-thin on my mandolin slicer), zucchini (cut thin as well), a bit of torn spinach, sauteed shredded carrot, sauteed sliced mushrooms, and shredded mozzarella.  I pre-cooked the carrot because otherwise it might not have been enough time in the oven to soften it properly.  I pre-cooked the mushrooms so they didn't release all their liquid and make my pan too wet.

I hadn't planned too well when figuring out how many noodles I needed.  I laid the dry noodles out in several various baking dishes to see what configuration would fit best in the right size baking dishes.  I worked it out that there would be two layers in each dish (that's all the noodles I had in the house, seemed perfect), but forgot that when you make lasagna you need to end with a layer of noodles on top to keep everything from drying out.  Luckily I had to trim the noodles to fit into my two baking dishes and ended up with enough scraps to make top layers for both dishes. 

Deliciousness inside
I put them together over lunch and then packaged them up and put them in the refrigerator so I could bake them when I got home.  It took about 50 minutes to bake at the ubiquitous 350 degrees, half of the time covered with foil and the second half uncovered.  

Verdict

This dish turned out great.  It was even better once we added a sprinkle of salt to the servings on our plates.  I'm still not very good at properly seasoning my dishes.  I'm always afraid I'm going to over-salt it since I like my food a little saltier, so it ends up that I under-salt it since I'm so paranoid about it.  If I had properly seasoned it from the start, it probably would have taken less salt overall.  I was afraid that the canned soup was going to be more than enough salt. 

It ended up that Sonny D never even tried this dish.  I'm still not sure if he would have liked it or not.  The veggies might have turned him off, but the creamy cheese sauce might have been appealing.  That kid is such an enigma.

I love making dishes that leave you with leftovers so you can have them for lunch later in the week.  This made several servings, probably about 6-8 depending on how hungry you are.     

My version was vegetarian, but it would be great with some cooked chicken.  And of course bacon would be welcome.  For veggies you could also add cherry tomatoes, roasted red pepper, broccoli, peas, artichoke hearts, asparagus, etc.

Wanna Chat?

I turned off the 'leave a comment' feature, so if you want to share what you're thinking about this or anything else, drop me an email at jhk1013 (at) gmail.com. It's so much more cozy than a comment, plus we can have a real conversation!

Thursday, May 8, 2014

Taming the Wild Yeast: Sourdough Crackers

When my wild yeast sourdough starter was fully established, I decided to make something with it.  I had sourdough crackers in mind because it's a good way to use the discard, the part of the starter you remove to make room when adding it the new flour and water to feed it. Plus the recipe doesn't rely on the yeast for leavening, so you don't have to catch the yeast at their peak to ensure maximum action. 
 
This was a lazy recipe.  First, I was too lazy to start it.  It seems intimidating because it's a multi-day recipe.  I had intended to start it the first night but then skipped it because I just wanted to go to bed.  I finally summoned enough energy to work on it the next night but immediately refused to follow the recipe properly, using it more as a guideline.  I didn't measure anything, just threw it together until it seemed right. 

But after all the laziness, the whole thing ended up being much simpler than I thought.  It's really not hard at all.  And you don't need a wild yeast starter, I used mine because it was there.  Here's a cracker recipe that doesn't use sourdough starter. and you can have it ready in about 15 minutes. If you are even slightly intrigued, I suggest you try it.  You will find that you are a cracker-making superstar! 

Inspiration

The Pocket Farmer sourdough crackers

This recipe is flexible, the author gives variations for herb crackers (what I made) and cheese crackers.

Ingredients

Day 1 
  • 1 cup sourdough starter
  • 1 cup flour
  • about 1/4 cup oil (I used vegetable oil because it was a neutral flavor and cheaper than butter, plus easier to use.   You could use butter, coconut oil, etc.)

Day 1+
  • 1/4 tsp salt
  • 1/4 tsp baking soda
  • some seasoning 

Directions

Day 1
Mix the starter, flour, and melted butter to make a dough. I kneaded mine a bit to get it really cohesive. 

The recipe called for a lot of melted butter (1/3 cup) but I decided to use vegetable oil instead, and a reduced amount.  I didn't measure anything but eyeballed it and mixed the ingredients up and kneaded it a tiny bit to get a cohesive ball.  I put it aside in a covered 4-cup glass measuring cup on the counter to ferment.  I wasn't sure how to cover it, so I used plastic wrap and a large washcloth on top of that.  The recipe said you need to let it sit out for at least 8 hours but the author mentioned she had had occasionally let hers sit for 36 hours.  I left on the longer side, I mixed mine together on Friday or Saturday night (can't really remember!) and finally baked the crackers up on Monday night. I think the longer you let it sit, the more sour it will be.
Fermented dough after several days.  Should have oiled the measuring cup!

Day 1+
Preheat the oven to 350 degrees.

After you mix up the initial starter + flour + fat and let it ferment, the rest of the rest of the recipe is really easy.  Add salt, seasoning, and baking soda and knead to incorporate, then roll it out.  I added Pampered Chef garlic & herb seasoning, but I wasn't sure how much to add since the recipe didn't specify.  I didn't want it to be overwhelming, so I only used 1/2 teaspoon seasoning. 
Rolled out dough my non-stick baking mat, scored into cracker shapes.
I rolled the dough out right on my baking mat (generic Silpat) rather than doing it on the counter and then transferring them.  If you don't have a baking mat, use parchment paper. 

After rolling it to the right thickness, I added some salt for the tops and lightly roll it one last time to push the salt in.   Then I used a pizza cutter to cut it into shapes.  You could probably use a knife, but I think it would drag through the dough too much. 

And the super neat thing is that you put it in the oven exactly like that with the score marks.  And then as the crackers bake, they separate themselves. Bake for 12-15 minutes.  I went with 15 minutes for the first batch, but they seemed a little too dark, so for the second batch I went with 14 minutes.  Next time I'll go with even a little less, maybe 12-13 minutes.
Baked crackers.  I didn't move them, they separated themselves.
To cool down you'll definitely want to put them on a cooling rack to let the air flow around them rather than a solid surface.  Don't put them in a container until they're fully cooled, otherwise they'll get soggy.  
Finished crackers, cooling down.

Verdict

Success! The sourdough taste is awesome, it's certainly sour.  I loved it and so did Husband Jeff.  Sonny D took them for his lunch several days in a row and actually ate them.  Yay!

And while everything was fine, they need more seasoning (probably 2 teaspoons depending on the flavor?) and less wheat flour.  I've read you shouldn't use solely whole wheat flour when you bake, but I'm always too lazy to pull out a softer, milder flour.  This recipe really shows why that's important.  Just too wheaty and heavy tasting. 

I actually rolled the dough out too thin because some of the ultra-thin ones are too light.  The thicker crackers have an enjoyable texture, a little more body.  I read reviews for a similar cracker recipe where the person talked about rolling them with bamboo skewers as a thickness guide, so I'll try that next time.

I've promised Sonny D that I'll make him a chocolate version sometime, but I have no idea what to do for that! I can't just add cocoa powder since it'll need some sweetness too.  I thought maybe copying a chocolate graham cracker recipe would be good, so that'll be my inspiration.

I'd also like to make a spicy Cajun cheesy version.  I used to make similar crackers when I was in high school and totally loved them.  It would be fun to also make a black pepper and sesame batch.  Oooh, and of course I'd love to whip up a cinnamon-oatmeal version (with fermented oats, of course!).  And it would be fun to make completely-from-scratch hummus to go with it. 

Wanna Chat?

I turned off the 'leave a comment' feature, so if you want to share what you're thinking about this or anything else, drop me an email at jhk1013 (at) gmail.com. It's so much more cozy than a comment, plus we can have a real conversation!